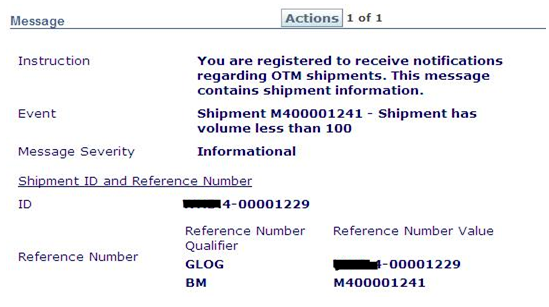
Agents in OTM are automation rules that watch for specific events in the system and trigger actions when those events occur — for example, sending a notification when a shipment is created, updating a field when an order is approved, or raising an alert when a condition is not met. If you are familiar with database triggers, Agents work on the same principle but at the application layer: an event fires, a condition is evaluated, and an action runs.
Example Requirement: Send a notification to a specific user when a shipment is created with a total volume less than 100 cubic feet.
High-level steps:
- Identify the business object — in this example, Shipment.
- Identify the OTM event — in this example, Shipment - Created.
- Identify the conditions that must be met — the shipment must be a bulk plan shipment and have volume less than 100 cubic feet.
- Define the action — send a notification.
- Define error handling actions.
Step 1: Create a Saved Query
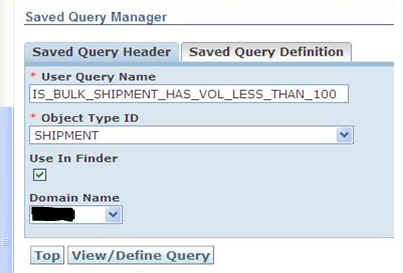
In the Saved Query Manager screen, enter the following details:
- User Query Name: Use underscores to separate words. For this example:
IS_BULK_SHIPMENT_HAS_VOL_LESS_THAN_100 - Object Type ID:
SHIPMENT - Domain Name: Enter your domain, e.g.,
XXX - Click View/Define Query
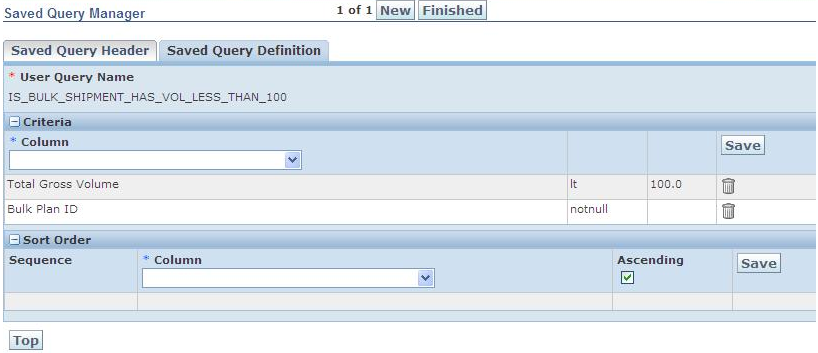
In the Saved Query Definition screen:
- Select the Total Gross Volume and Bulk Plan ID columns.
- Define conditions: Bulk Plan GID is not null AND Total Gross Volume is less than 100.
- Click Finished.
Step 2: Create a Saved Condition
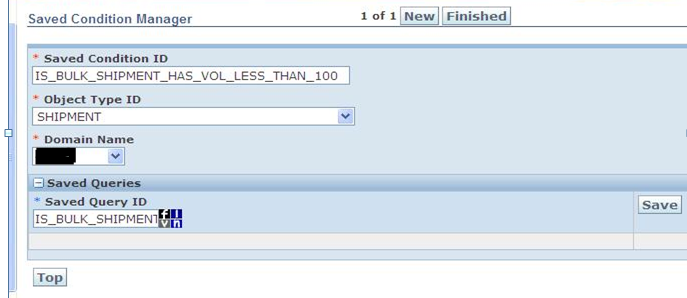
A saved query must be associated with a saved condition before it can be referenced from an agent.
In the Saved Condition Manager screen:
- Saved Condition ID:
IS_BULK_SHIPMENT_HAS_VOL_LESS_THAN_100(use the same name as the query) - Object Type ID:
SHIPMENT - Domain Name:
XXX - Saved Query ID:
IS_BULK_SHIPMENT_HAS_VOL_LESS_THAN_100 - Click Save against the saved query record, then click Finished.
Step 3: Create the Agent
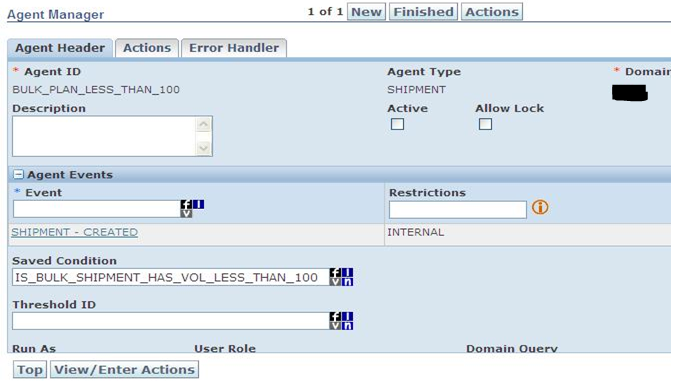
In the Agent Header screen:
- Agent ID: Give the agent a descriptive name.
- Agent Type:
SHIPMENT - Domain Name:
XXX - Active: Check this box when the agent is ready for use.
- Agent Event:
SHIPMENT – CREATED - Restrictions: Click the I icon to see restriction options (Integration, User, Internal). Select User to trigger only on actions performed manually within OTM.
- Saved Condition:
IS_BULK_SHIPMENT_HAS_VOL_LESS_THAN_100 - Click View/Enter Actions.
Step 4: Define Agent Actions
Click Add Action and select Notify Contact.
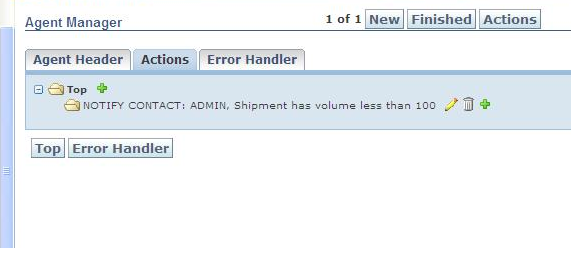
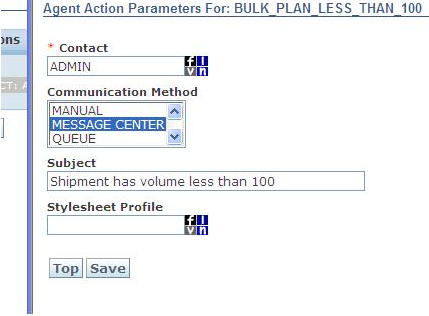
In the Notify Contact action:
- Contact: Select the user to notify — in this example,
ADMIN. - Communication Method:
MESSAGE CENTER(or select Email depending on requirements). - Subject: Write the notification message text.
- Click Save.
- Optionally click Error Handler to define actions that run if the agent fails — for example, sending an alert to the system administrator.
- Click Finished.
Review / Verify Results:
Select an order release and bulk plan a shipment with volume less than 100 cubic feet. After the shipment is created, click Refresh Messages in the Message Center at the top of the screen.