OTM supports several methods for receiving data from external systems. This topic covers XML-based integrations, which are the most common approach in OTM implementations.
Integration Methods Overview:
GlogXML Schema:
OTM’s standard XML format is defined by the GlogXML schema (GlogXML.xsd). This schema describes the XML structure for every OTM entity — Location, Order Release, Shipment, Service Provider, Rate Offering, and more — along with field-level documentation. You can download the schema from inside OTM at:
Shipment Management > Business Process Automation > Integration > Integration Manager > Retrieve Schemas > GlogXML.xsd
Open the downloaded XSD file in any XML or text editor to look up the structure for the entity you want to load.
Manual XML Upload — Step by Step:
The following example shows how to manually upload a Location record to OTM using a GlogXML XML file. Location is used here as an example — the same approach applies to any other OTM business object such as Order Base, Order Release, Shipment, Service Provider, Rate Offering, Invoice, and more. The only difference is the GLogXMLElement you choose inside the transmission body.
Read GlogXML.xsd and identify the XML structure for the entity you want to load (e.g. Location). Map your source data values to the OTM XML fields. A sample Location XML file looks like this:
<?xml version="1.0" encoding="UTF-8"?>
<Transmission xmlns="http://xmlns.oracle.com/apps/otm/transmission/v6.4">
  <TransmissionHeader>
    <UserName>DBA.ADMIN</UserName>
    <Password>CHANGEME</Password>
    <IsProcessInSequence>Y</IsProcessInSequence>
  </TransmissionHeader>
  <TransmissionBody>
    <GLogXMLElement>
      <Location>
        <TransactionCode>IU</TransactionCode>
        <LocationGid>
          <Gid>
            <DomainName>ABC</DomainName>
            <Xid>TEST-LOCATION-001</Xid>
          </Gid>
        </LocationGid>
        <LocationName>Test Location, Houston, TX, USA</LocationName>
        <Address>
          <AddressLines>
            <SequenceNumber>1</SequenceNumber>
            <AddressLine>1039 East Plantation Drive</AddressLine>
          </AddressLines>
          <City>CLUTE</City>
          <ProvinceCode>TX</ProvinceCode>
          <PostalCode>77531</PostalCode>
          <CountryCode3Gid>
            <Gid><Xid>USA</Xid></Gid>
          </CountryCode3Gid>
        </Address>
        <LocationRefnum>
          <LocationRefnumQualifierGid>
            <Gid><Xid>ORIGIN</Xid></Gid>
          </LocationRefnumQualifierGid>
          <LocationRefnumValue>CUSTOMER</LocationRefnumValue>
        </LocationRefnum>
        <LocationRole>
          <LocationRoleGid>
            <Gid><Xid>CUSTOMER</Xid></Gid>
          </LocationRoleGid>
        </LocationRole>
      </Location>
    </GLogXMLElement>
  </TransmissionBody>
</Transmission>TransactionCode IU means Insert or Update — OTM will insert the record if it does not exist, or update it if the GID already exists. Use D to delete a record.Navigate to:
Business Process Automation > Integration > Integration Manager > Upload XML/CSV Transmission
Browse for your XML file and click Upload.
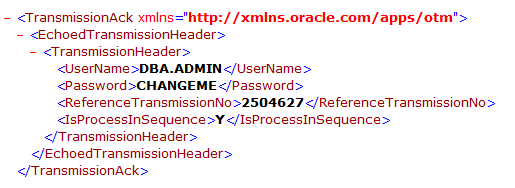
After clicking Upload, OTM displays a log showing the transmission number and initial processing status. Note the Transmission Number — you will need it to verify the final processing status.
Navigate to:
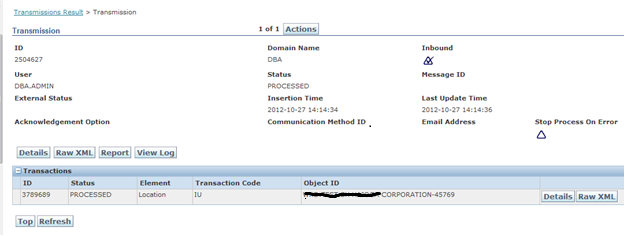
Business Process Automation > Integration > Transmission Manager
Query for your transmission number. The status should show as PROCESSED. If there are errors, click the Report button to see the error details — common errors include missing foreign key references (e.g. a Domain or Location that does not yet exist in OTM).
Posting XML via Middleware:
Middleware platforms (Oracle SOA/BPEL, webMethods, MuleSoft, etc.) post GlogXML directly to the OTM WMServlet endpoint using an HTTP POST request.
https://<OTM-Application-URL>/GC3/glog.integration.servlet.WMServletSample Payload — Update Voucher Status:
<?xml version="1.0" encoding="UTF-8"?>
<Transmission xmlns="http://xmlns.oracle.com/apps/otm/transmission/v6.4">
  <TransmissionHeader>
    <AckSpec>
      <ComMethodGid>
        <Gid><Xid>HTTPPOST</Xid></Gid>
      </ComMethodGid>
      <AckOption>ERROR</AckOption>
    </AckSpec>
  </TransmissionHeader>
  <TransmissionBody>
    <GLogXMLElement>
      <GenericStatusUpdate>
        <GenericStatusObjectType>VOUCHER</GenericStatusObjectType>
        <Gid>
          <DomainName>YOURDOMAIN</DomainName>
          <Xid>20240823-00001310</Xid>
        </Gid>
        <TransactionCode>IU</TransactionCode>
        <Status>
          <StatusTypeGid>
            <Gid>
              <DomainName>YOURDOMAIN</DomainName>
              <Xid>PAYMENT STATUS</Xid>
            </Gid>
          </StatusTypeGid>
          <StatusValueGid>
            <Gid>
              <DomainName>YOURDOMAIN</DomainName>
              <Xid>PAYMENT_RECEIVED</Xid>
            </Gid>
          </StatusValueGid>
        </Status>
      </GenericStatusUpdate>
    </GLogXMLElement>
  </TransmissionBody>
</Transmission>
Sample OTM Response (success — no errors):
<otm:TransmissionAck xmlns:otm="http://xmlns.oracle.com/apps/otm/transmission/v6.4">
  <otm:EchoedTransmissionHeader>
    <otm:TransmissionHeader>
      <otm:ReferenceTransmissionNo>311245595</otm:ReferenceTransmissionNo>
      <otm:AckSpec>
        <otm:ComMethodGid>
          <otm:Gid><otm:Xid>HTTPPOST</otm:Xid></otm:Gid>
        </otm:ComMethodGid>
        <otm:AckOption>ERROR</otm:AckOption>
      </otm:AckSpec>
    </otm:TransmissionHeader>
  </otm:EchoedTransmissionHeader>
</otm:TransmissionAck>
When AckOption is set to ERROR, OTM only returns a response if there is an error — a response like the above (with no error element) confirms the transmission was accepted. Use the ReferenceTransmissionNo to query the Transmission Manager and confirm the record was processed successfully.
AckOption to ALWAYS in the TransmissionHeader.What’s Next:
If your source system is Oracle E-Business Suite or another Oracle database, you can post GlogXML directly from PL/SQL using the UTL_HTTP package — no middleware required. The next topic walks through a complete working example.
Next Topic: Post Data to OTM via HTTP Request